
We are excited to have a guest post from our friend and long time creator of amazing MotionBuilder tools and plugins Neill3d AKA Sergei Solokhin. He also has a site https://docs.openmobu.org/ and we shared a lot of his past MotionBuilder work here https://www.riggingdojo.com/2019/02/12/open-motionbuilder-rigging-tools/

Thank you and enjoy!
The Wall and MoPlugs Dev Story by Neill3d – Sergei Solokhin
The story is about a feature film project where I’ve contributed. Only now I have enough time to finish and share some of my project thoughts, so I think it’s better to do it later than never.
Intro
The project is a feature film, a kind of virtual essay, titled The Wall. I won’t go into details about the film’s plot, script, or art production here. I’ll leave that out of this article, but you can learn more from the film’s page, interviews with the screenwriter David Hare, the director Cam Christiansen, and other materials. I will provide links at the end of this article. In this article, I’d like to share my personal experience of working on the project, as well as discuss some of the technical details and solutions I’ve implemented.
Before I started to work on film, I was leading a small mocap studio AnimArt. I also actively maintained a blog for mocap and animation Neill3d.com, especially about the MotionBuilder platform, sharing my thoughts, scripts and plugins. And that sharing paid off in full.

One day, I was contacted by Cam Christiansen:
Friday, March 8th, 2013 at 5:56 PM
“Sergey, is there a time we can talk about developing some MotionBuilder tools for us? I’m not sure what your correct email is.”
As a part-time job I decided to take on the task of developing several scripts aimed at optimizing large scenes. Throughout 2013, I worked on various scripts and plugins tailored to the project’s needs, and they proved to be useful.
Cam had a vision to avoid switching to other applications and concentrate the creation process in one place. That required implementing editing, post-vis and rendering features into MotionBuilder. And that sounded like a crazy and huge deal, but I was open to such engineering and animation challenges.
After I have created scripts and several plugins, Cam asked if I would like to join the film project on a permanent basis and become fully immersed in the production.
I decided that it’s a great chance and a great journey to join. Also my leading of the MoCap studio turned into routine management tasks and I was looking for an opportunity to get back to development and participate in something ambitious. And that’s what I did.
There is no plan, there is a way
I joined the project on a remote basis, starting with several ideas on how to implement the director’s vision for facial animation visualization, managing the dense geometric meshes of the world, and creating procedural animation elements, such as constructing walls.
Interesting fact. The team was based in Canada, but they were allowed to spend three months in Thailand during the winter and continue working in a warm and pleasant environment. This is one of my favorite memories and stories about team organization during cold winter evenings.
I began working in the winter from Thailand, where one of the team members, Mitch Barany, was on a nearby island. Initially, I managed to make progress, which gave hope that building such a creative platform and assembling film scenes efficiently was achievable.
The content creation was in the manner of post-production. I mean that the artists were not supposed to prepare optimized models, clean up animations, etc. The scenes became more detailed and this increasingly distanced us from real-time performance and stability.
Another stumbling block was the need for me to develop plugins while simultaneously working on production. Naturally, I could not guarantee their immediate stability. This led to delays, pushed deadlines further, and prevented us from reaching the desired results. I, for my part, tried not to interfere with the content at the early stage and focused on creating more and more software solutions to address the tasks. However, it felt more like a project within a project.
After about a year and a half, it became clear that even with new software solutions and supporting scripts, we were not making effective progress on the film. This was a difficult moment; the film’s budget was limited, and most of the team left the project. Eventually, only two of us remained: the director, who also worked as an artist-animator-designer, Cam Christiansen, and me.
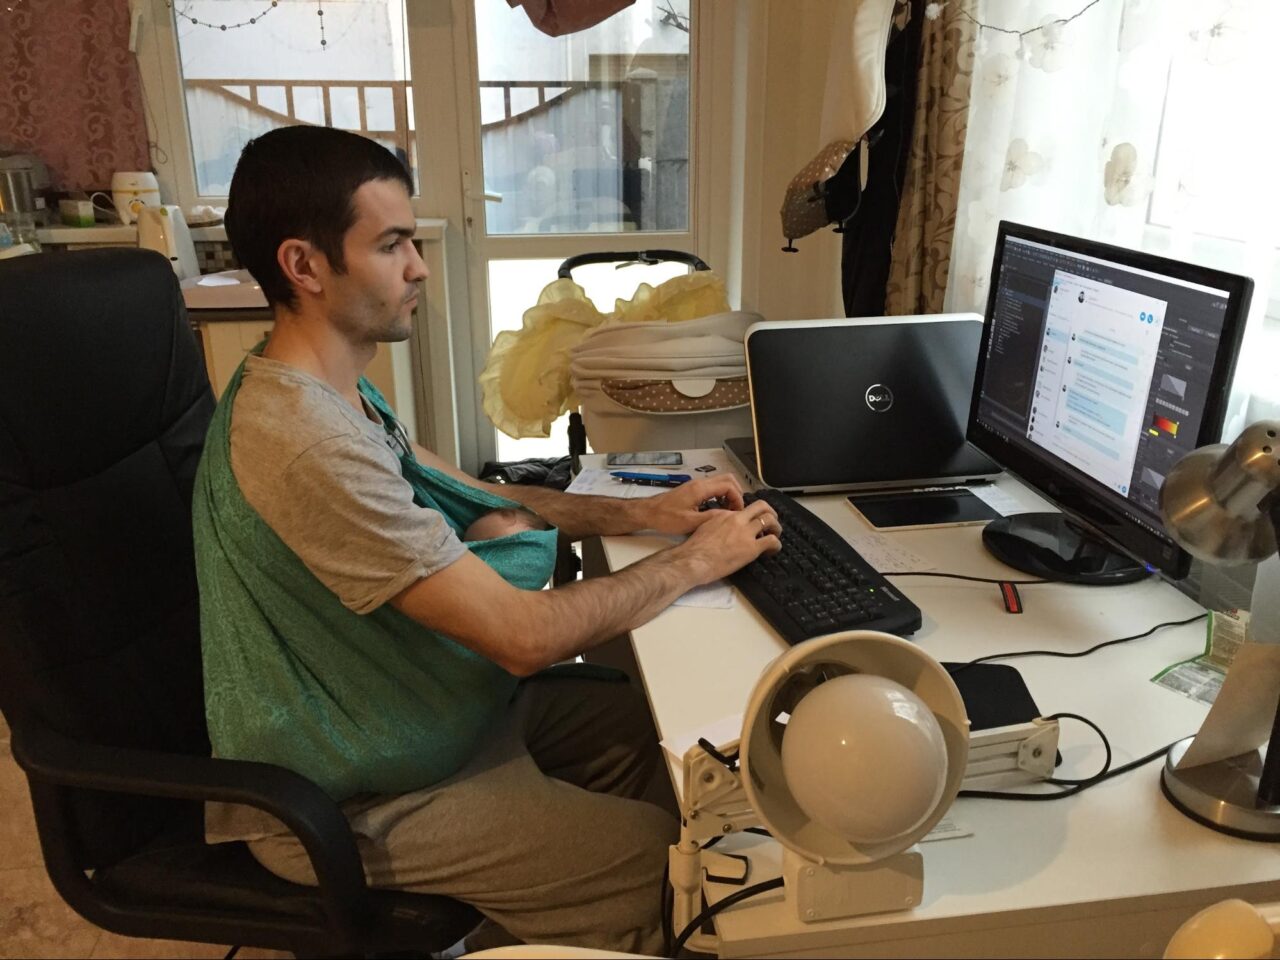
At this very moment I could have despaired and started looking for a new job, my child was born. Since I was actively taking part in caring for the baby, I didn’t dwell on negative thoughts and kept working. Somehow, the film’s producers continued to fund my work. Whether they still believed the film could be saved or felt it would be wrong to leave me unemployed at such a critical time remains a mystery. Personally, I lean toward the second explanation.
One way or another, I continued to receive financial support, even though there was little hope and a proper team left. I kept working, delving deeper into the film’s content to fix the situation, not just through software solutions but with overall optimization. Meanwhile, Cam kept drawing, building models, and assembling new scenes for the film. Time flew by for me; with a small child, I had no set schedule. I worked whenever I could, especially while the baby slept. I stayed on duty with my daughter and used every moment to return to work on the project.
Time passed, and the moment came when several scenes of the film were completed, and our work began to attract interest again. In my situation, with a small child, I simply did not have the time to worry or feel sad about the project’s fate—I was grateful for the opportunity and kept working. Perhaps this detachment from the state of affairs helped me overcome that barrier relatively easily and avoid a moral downturn. When the baby grew older and the infant colic phase passed, allowing me to get more sleep and take a fresh look at the state of the film, I discovered that a real chance had emerged. We had managed to rework and optimize a significant amount—the massive environment geometries, character models, skeletal rigging and found solutions for facial animation. The plugins were more stable, and scenes were rendering smoothly. Now, it was just a matter of continuing and not giving up.
This marked a turning point after which the film could be viewed in parts. There was still a great deal of work ahead. Yet the producers believed that with trust and patience, we were beginning to make progress. That’s exactly what happened: our funding was extended, and for another year or so, we continued with additional resources and team members.
With the extra support and a strengthened team, we assembled all the necessary parts of the film in the required quality for cinema screens, and the film was approved and accepted by the producers.
The film The Wall premiered at the Annecy International Animation Film Festival in France, one of the most prestigious animation festivals in the world. Additionally, it was screened at the Toronto International Film Festival (TIFF), where it garnered attention for its unique blend of animation and documentary storytelling.
Happy End!
Now, after sharing this story, I would like to devote some attention to the various aspects of the project that required software solutions.
Solutions
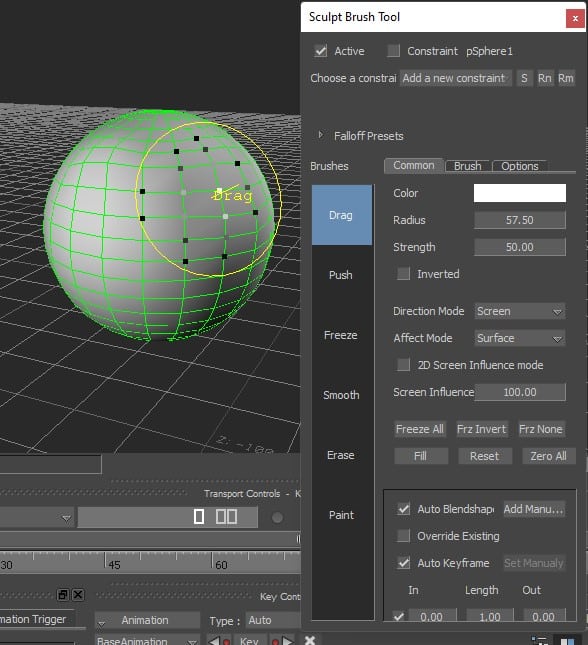
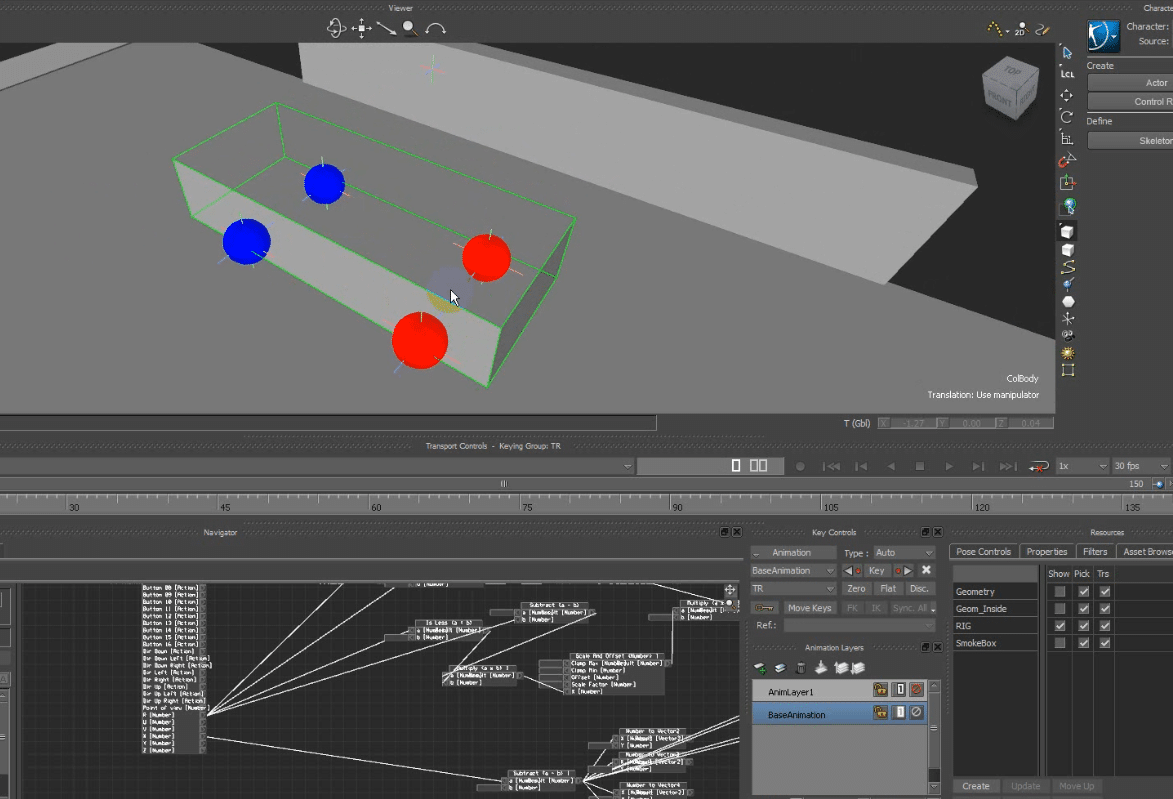
Correction Shapes
When an artist creates a previs and seeks to improve it through high-quality iterations, one of the primary tools we needed was sculpting and the creation of corrective shapes. Once the camera is chosen and the angle is set, it becomes possible to finalize the animation from the camera’s perspective and make pose and silhouette adjustments using this utility.
The solution involved two main components. The first was the sculpting tool itself. I developed a minimal set of brushes for working with geometry, including pull/push, drag, smooth, freeze, erase, and paint. Additionally, it was essential to ensure support for working with a Wacom pen, enabling operations to respond to the pen’s pressure for intensity control.
Behind the scenes, this tool operates as a deformation constraint that displays changes to the model’s geometry on top of the standard deformation.
NOTE: in MotionBuilder the operation order is the following – first goes keyframe, then constraint, blendshapes, skinning deformation, deformed constraint and point cache.
The deformed constraint is used for a preview of the changes made to the shape. If the result was satisfactory, it could be saved as a new blendshape on a model. In this case, I developed the logic for calculating the corrective shape under skinning. The reason for this is that the character deformation we see on screen is a combination of the base mesh, followed by blendshapes and the skinning applied on top. To save the corrective blendshape by sculpting geometry in a given frame, it is required to subtract the entire skinning effect from the final pose and record the difference between the resulting positions and the currently active blendshapes on top of the base geometry.
This became a convenient and essential tool for the workflow and iterations during the film’s production.
I would also like to highlight a second utility related to this topic: the blendshape toolkit. I developed this manager to display current animated blendshapes and provide additional functionality for duplicating, organizing, saving, and loading from an external file.
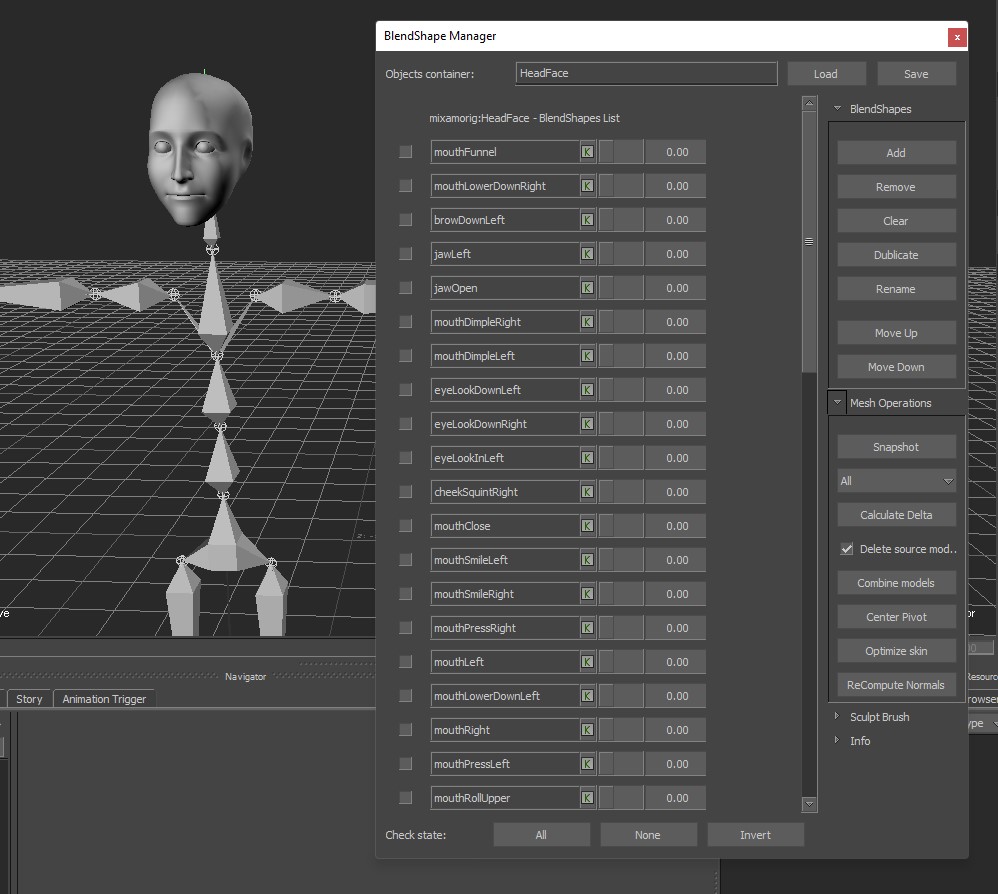
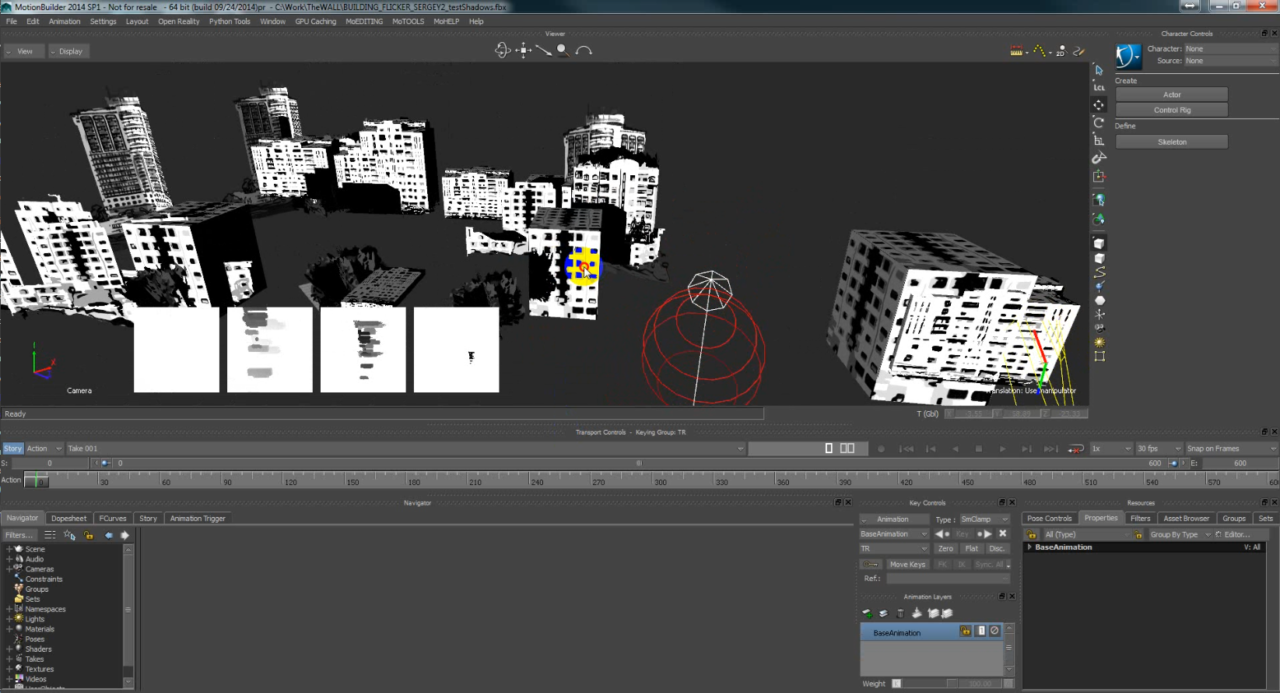
The utility also includes critical production operations for creating duplicates of the model mesh. In this case, the duplicate has all deformations, constraints, skinning baked into the mesh. There is also an operation for calculating the difference between the deformed and base rigs. Another essential operation is Combine Models. In our scenario, many environment models were assembled from separate pieces, and with MotionBuilder, we could significantly enhance scene performance by merging static geometries into a single model.
Character Animation
For character animation, no special tricks or custom rigs were necessary. The functionality provided by MotionBuilder was more than sufficient, requiring only a bit of skill and expertise. I have experience working with character animation in a motion capture studio. In this context, all movement was bone-based, with carefully selected rotation centers, a simple HumanIK standard skeleton, and bones for facial animation.
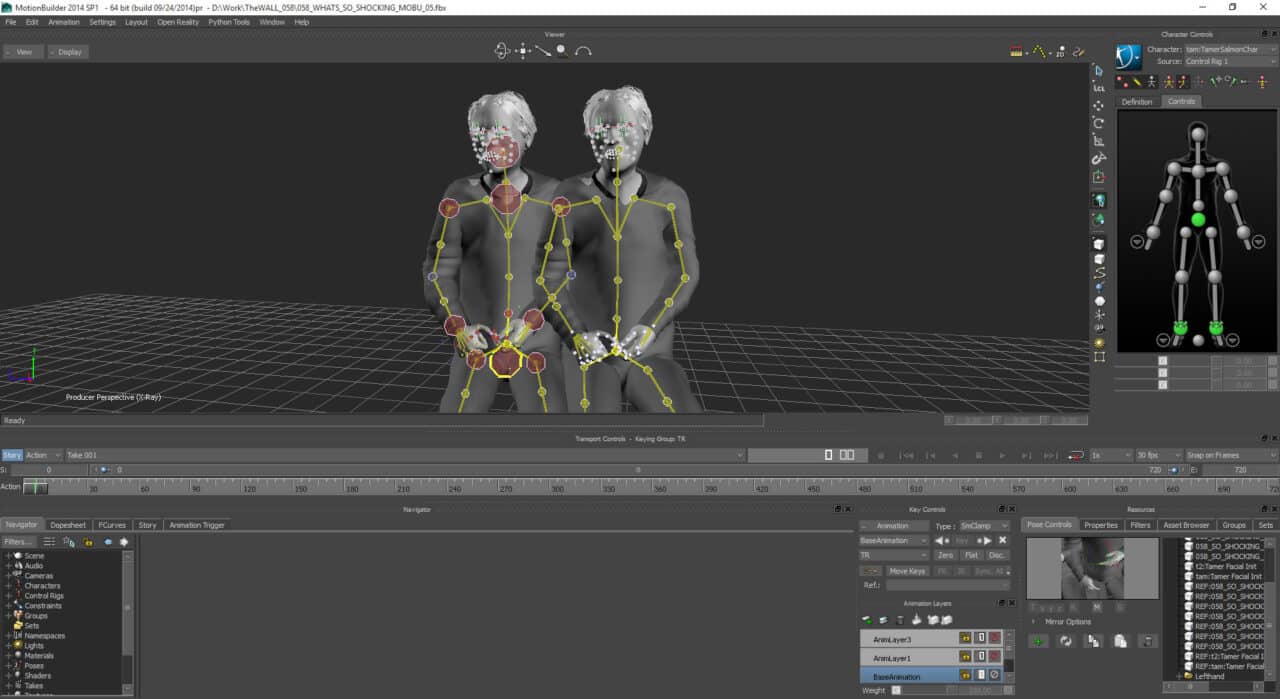
The animations were retargeted from data recorded on a big studio in the UK. And it was a standard pipeline for mocap retargeting and animation cleaning.
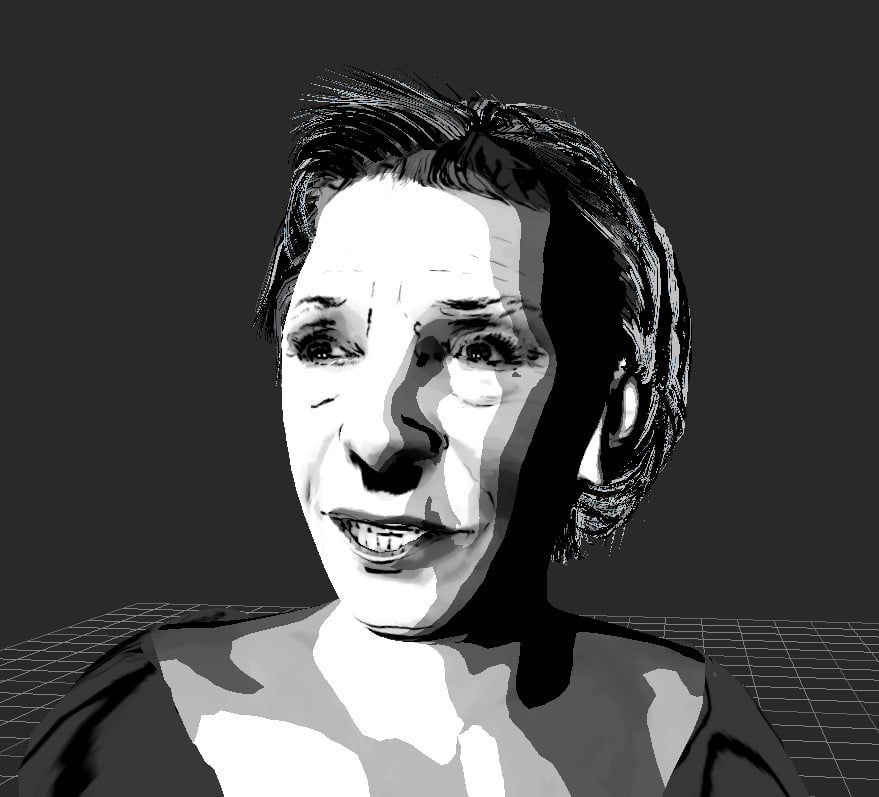
Facial Animation

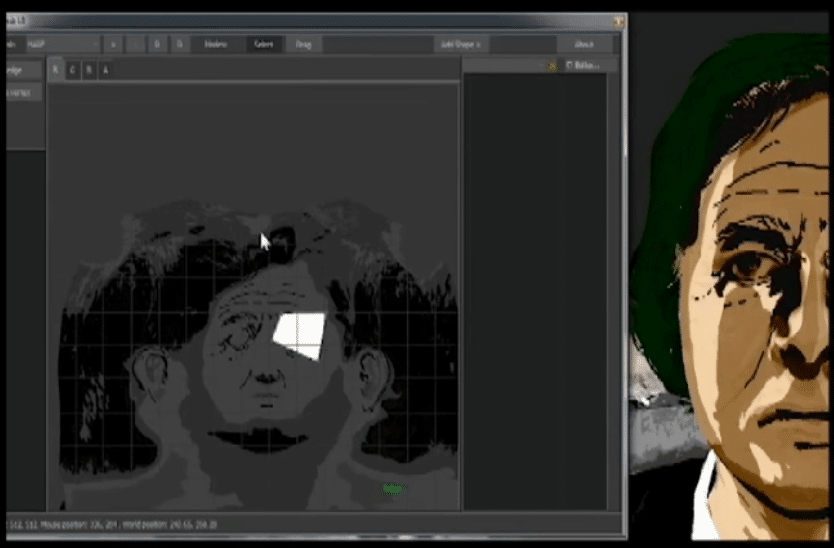
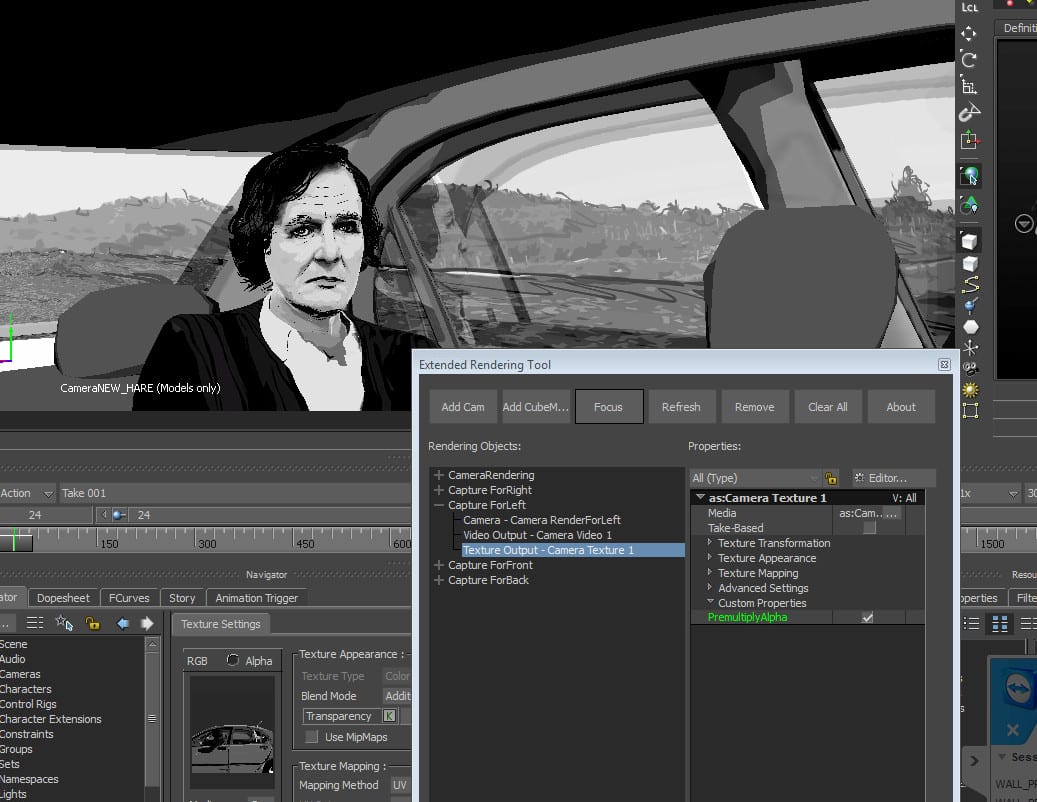
The motion capture session included simultaneous facial capture on video. The director’s vision was to transfer this facial animation onto the 3D characters’ faces. The 3D character models were designed to resemble the actors used in the capture, but were not exact replicas; they were artistically modeled versions, not precise 3d scans. This makes the need to retarget the video footage onto the characters’ faces, incorporating additional processing and stylization.
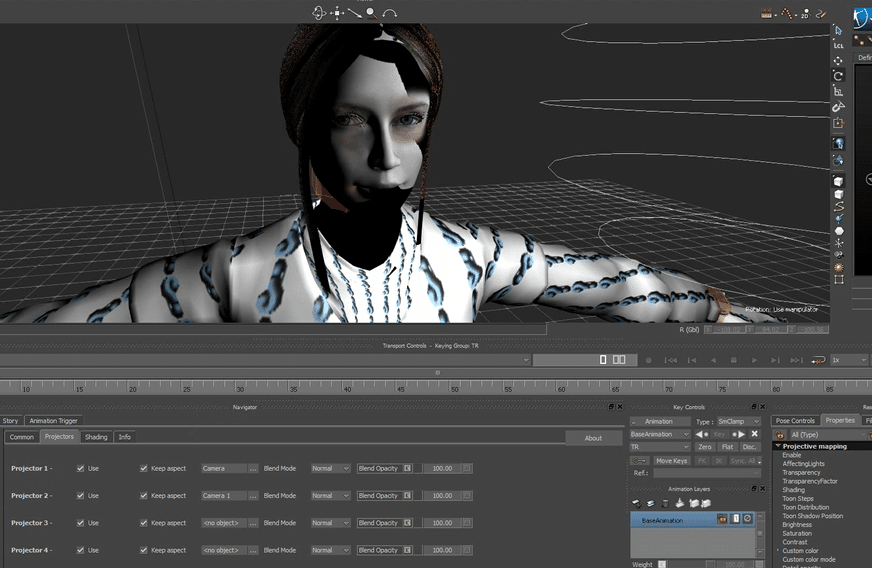
To achieve this in real-time, a specific concept was adopted. The idea was to divide the video footage into facial zones: mouth, left and right eyes with eyebrows, and nose. These four sections would then be projected onto the 3D model. This approach allowed for adjustments that matched the proportions of the 3D model’s face. Additionally, the face itself would need to be animated, with the video projection providing extra visual details.
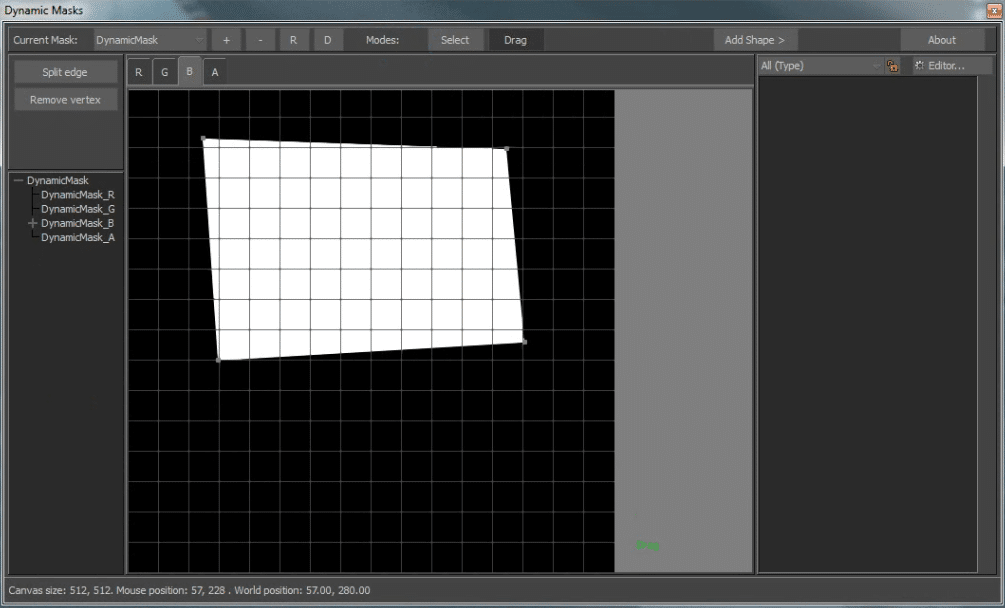
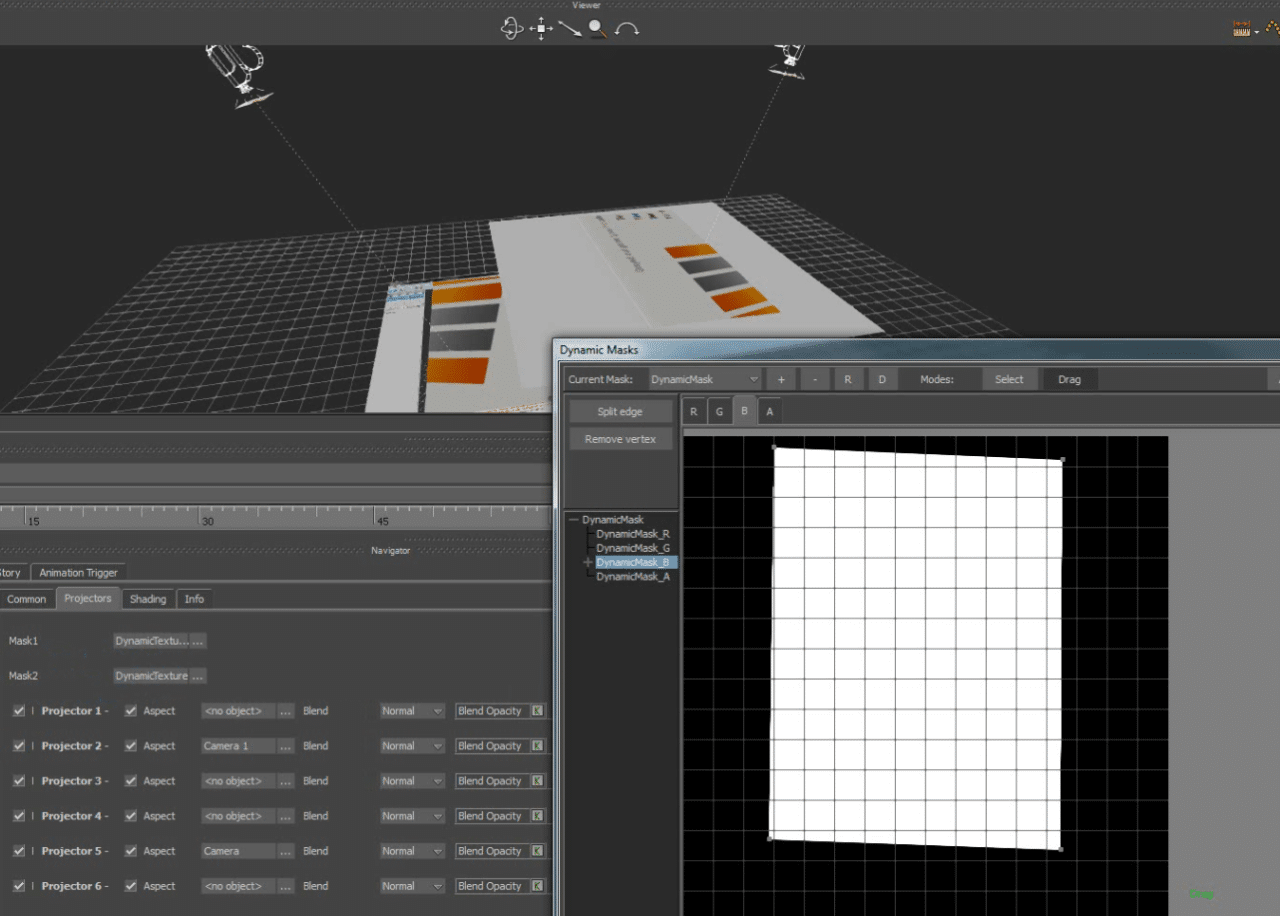
To implement this approach, I developed a tool for dynamic masks and a specialized shader capable of projecting up to six images onto a model over the standard diffuse texture.
The dynamic masks allowed for masking out the specific region of the image by using the alpha channel. Since the video was captured using an HMC (head-mounted camera), a static mask was sufficient to isolate the desired fragment. However, the masks tool also supported animated regions, enabling them to be fully dynamic if needed.
Under the hood, the masks utilized the NV_path_rendering extension. This allowed for real-time drawing of spline shapes filled with color in the required texture color channel, which the shader then used for image masking. To optimize performance, four masks for different facial regions were packed into a single texture.
The shader utilized the Camera object to read projection matrices and positioning, which were then used for projecting the texture onto the 3D model. The texture projection was depth-clipped to ensure visibility only on the face front geometry and not on the back of the head. Additionally, it was clipped based on the selected dynamic mask.
The head model itself was animated from the same footage by tracking down the 2d face landmarks and animate bones from them.
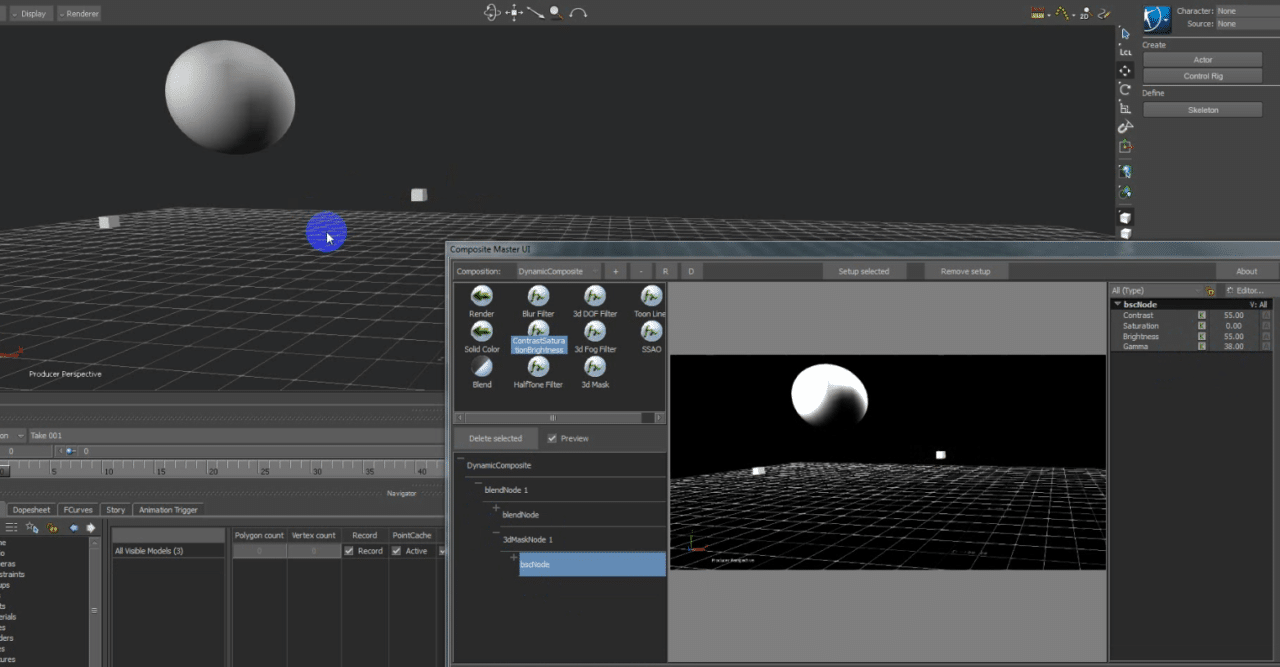
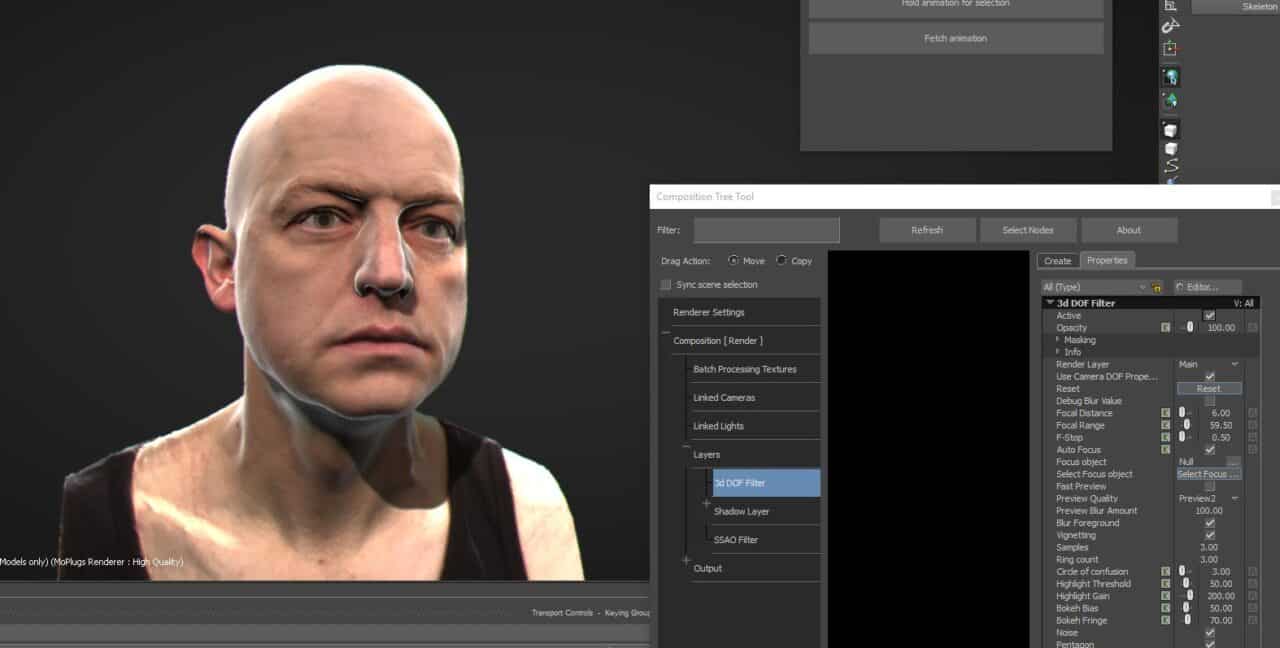
Post processing and Composition Master
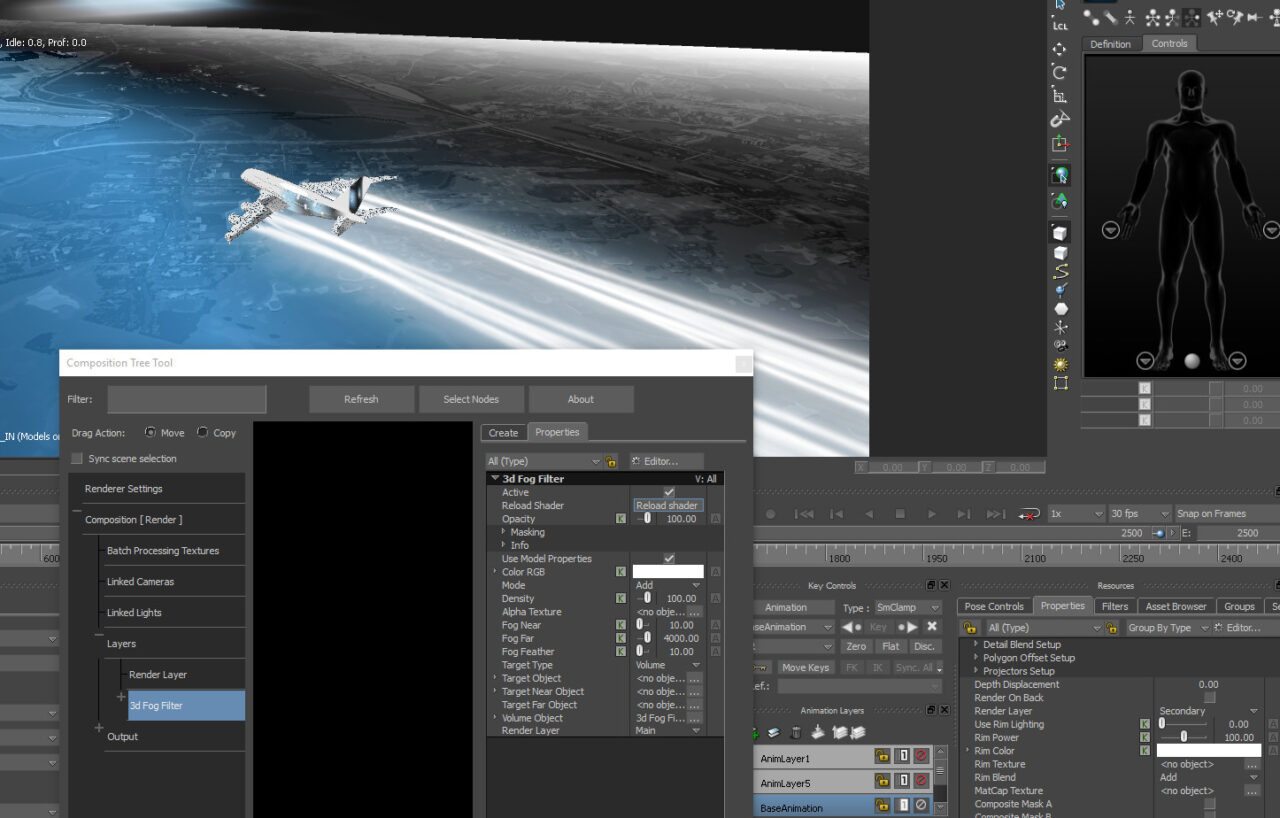
An essential part of iterative work on film scenes was post-processing. The idea here was to create a tool to avoid rendering and post-processing in a separate program, instead performing this directly in MotionBuilder. Using the OpenReality SDK, I began by writing a scene manager plugin to intercept calls before and after scene rendering. From there, I integrated a framebuffer into which the scene could be rendered.
The framebuffer was there to extract color and depth maps from the 3D scene, pass them through post-processing GLSL shaders, and render the final texture on-screen over the 3D scene.
The composition master itself was structured as a nested hierarchy of input data (texture, color, procedural texture), effects, and output objects. The root of this tree was the final output image, with effects added in reverse order and each computation branch ending in an input image. The blending element had two branches.
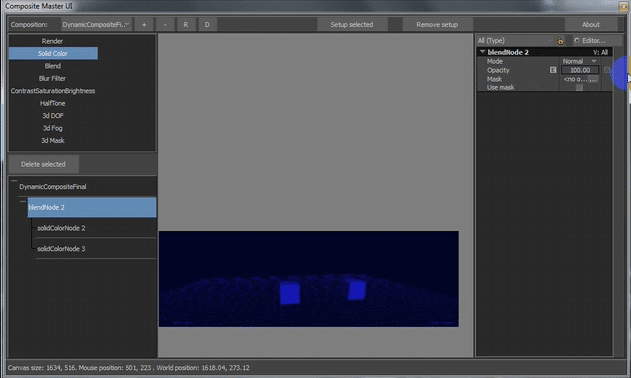
The post-processing graph was built according to this tree logic, allowing it to be saved and loaded from a separate file. The utility itself was written in Python, utilizing standard MotionBuilder interface elements without direct use of Qt.
Among the source materials for post-processing, we eventually added additional elements such as rendering 3D objects into masks, shadows, reflections (cubemap) and procedural textures like gradients. We also included the scene depth texture (useful for effects like depth of field), color texture, and supplementary data from the scene, such as fog areas, decal regions, and similar elements.
3d decals, regions and a post process filter. The concept behind this feature was to automate the creation of a screenshot from a set camera angle, which would then be sent directly to Photoshop. In Photoshop, a new layer of details could be added and then sent back as a projection onto the geometry. This workflow allowed for dynamic creativity in enhancing visual elements. Moreover, the blending and visibility of decals could be animated, offering even greater flexibility for creative expression.
The result was a highly functional and flexible utility for implementing the director’s creative visions.
TECH NOTE: for composition effects I’ve used compute shaders, the downside of using them compare to render to quad and process with fragment shader is that you have to implement derivatives and do an interpolation logic manually
OpenGL derivatives – https://registry.khronos.org/OpenGL-Refpages/gl4/html/dFdx.xhtml
TECH NOTE: for shading I’ve used a nice shader effect library nvFX (by Tristan Lorach) which helps to manage a structure on top of glsl shader, such as includes, combination of shaders, etc.
Composite Master Toolkit – https://www.youtube.com/watch?v=Xss74zEdCdc
Shading
The drawing context itself couldn’t be altered, as it was predefined by MotionBuilder and required the use of OpenGL. However, by leveraging extensions, certain stages of geometry preparation and rendering could be made significantly more efficient. These stages, which we could capture, became key points for implementing features and optimizations.
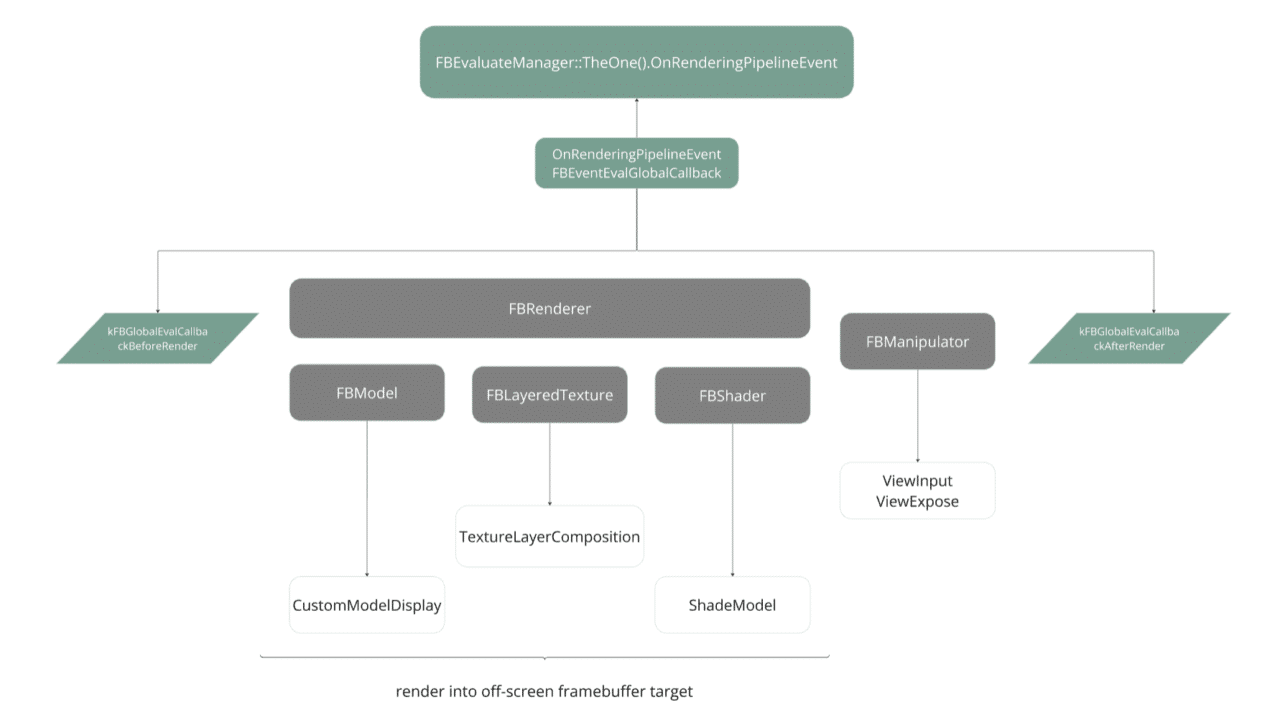
The OpenReality SDK provides an extensive toolkit for creating plugins targeting various parts of the software. For debugging and schematic graphics within a scene, I utilized FBModel when drawing with a Custom Drawing handler. This approach offers a straightforward and efficient way to render geometry directly into the scene.
Key Tools and Techniques
- FBLayeredTexture/FBTexture: These were used with Dynamic Texture to store textures in video memory or for a custom mix between textures.
- FBShader: This allowed customization of how models were rendered, from individual objects to entire groups with material grouping. A model could have multiple shaders assigned within the scene.
- Shaders were occasionally used as metadata for rendering rather than direct visualization. For example, a masking shader could specify which mask models were to be rendered into. This shader didn’t handle visualization itself but prepared a list of models for additional rendering into specific masks.
- Shaders followed either a short pipeline with hooks like pre-render and ShadeModel, or a longer Material Effect pipeline, which allowed more detailed control during geometry passes, material changes, and similar processes.
- FBManipulator: This versatile tool enabled the creation of viewport manipulators, either as temporary tools or always-active background elements. Indirect use of manipulators significantly enhanced flexibility for handling user interactions, supporting tasks such as rendering overlays (HUD rendering stage) and processing user input seamlessly.
- FBEvaluateManager: This provided valuable hooks, such as the OnRenderingPipelineEvent, at two critical points—before and after scene rendering. These hooks were instrumental in attaching custom framebuffers and capturing scene visuals into textures. This capability laid the foundation for post-processing plugins.
Production Real-Time
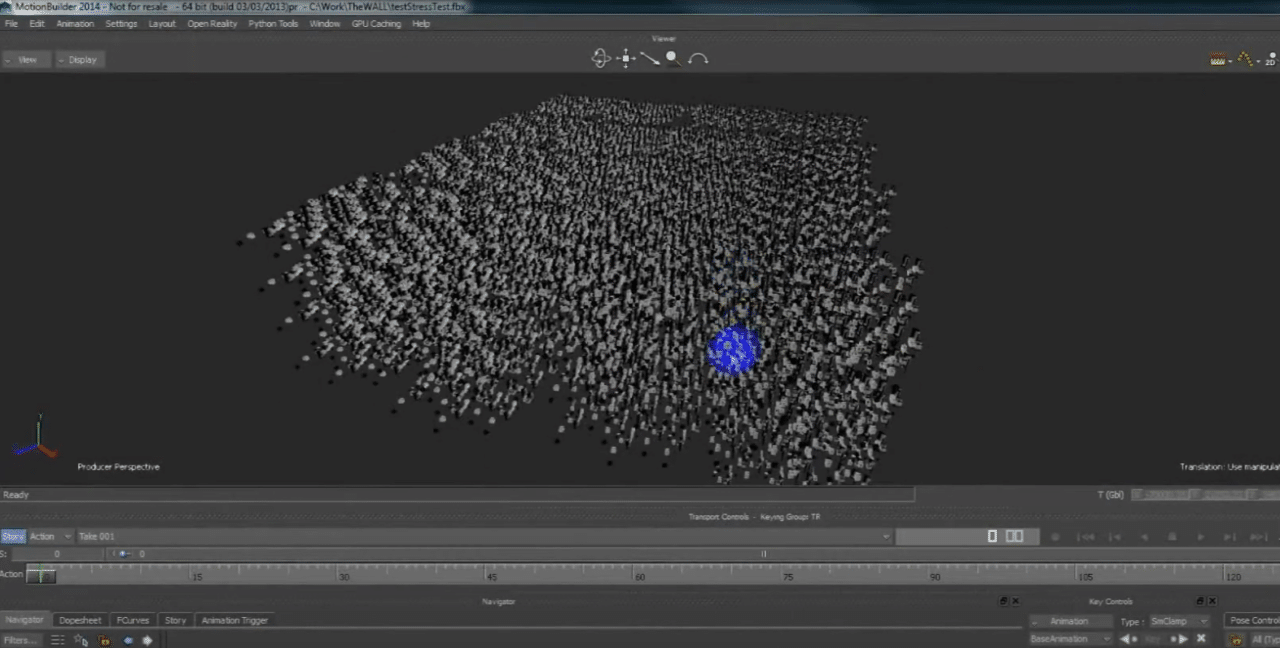
The scenes and models for the project were originally created in Autodesk Maya and Maxon Cinema4D. Since these assets were typically for offline renderer, artists prepared them without any special real-time optimization. In our case, however, we were working on a fully real-time platform. This presented significant challenges due to the sheer number of detailed models, dense meshes, and separate objects, all of which heavily impacted performance and stability.
To address these issues, I developed a range of tools and methods aimed at optimizing scenes and improving real-time performance.
Optimization Techniques
- Cleanup Manager
Since the scenes were full of imports from external programs, they often included far more objects, textures, and materials than were actually in use. To tackle this, I developed a Cleanup Manager to analyze dependencies within a scene and remove unnecessary elements efficiently. - Texture Optimization
- Texture Manager and DDS Batch Manager: The scenes contained a large number of textures, which consumed significant video memory and often lacked mipmap levels. A key optimization involved converting these textures to the DDS format, which is supported by MotionBuilder (MoBu). DDS offers compression, faster loading, and built-in mipmap support, reducing memory usage and improving performance.
- The batch manager is available on github – https://github.com/Neill3d/BatchDDS
- Geometry Consolidation
- I implemented functionality in the Blendshape Toolkit to merge multiple small models into a single geometry. MotionBuilder’s scene graph struggles with numerous small objects, and consolidating them significantly improved scene management and rendering efficiency.
- Leveraging OpenGL 4 Extensions
- I utilized OpenGL 4 extensions, such as NV Bindless Graphics, to enable more efficient rendering of geometry, reducing overhead and boosting frame rates.
- Scene Simplifications
- Replacing some complex scenes with cubemap backgrounds to reduce rendering costs.
- Substituting 3D crowd characters with a sprite system or animated textures, significantly lowering the computational load for background elements.
- Baking Constraints and Logic
- Many scenes relied on relation constraints or logic-driven constraint boxes, which were performance bottlenecks. I baked these into C++ code, enabling the use of parallel evaluation with MotionBuilder’s Evaluation Manager. This allowed for much faster and more stable scene evaluations.
These tools and methods collectively stabilized performance in real-time environments, making it possible to handle the originally unoptimized assets while maintaining high-quality visual output.
GPUCache
To squeeze more performance out of frame rendering, I began studying NVIDIA’s CAD scene demos, where the bindless approach demonstrated a significant boost in efficiency.
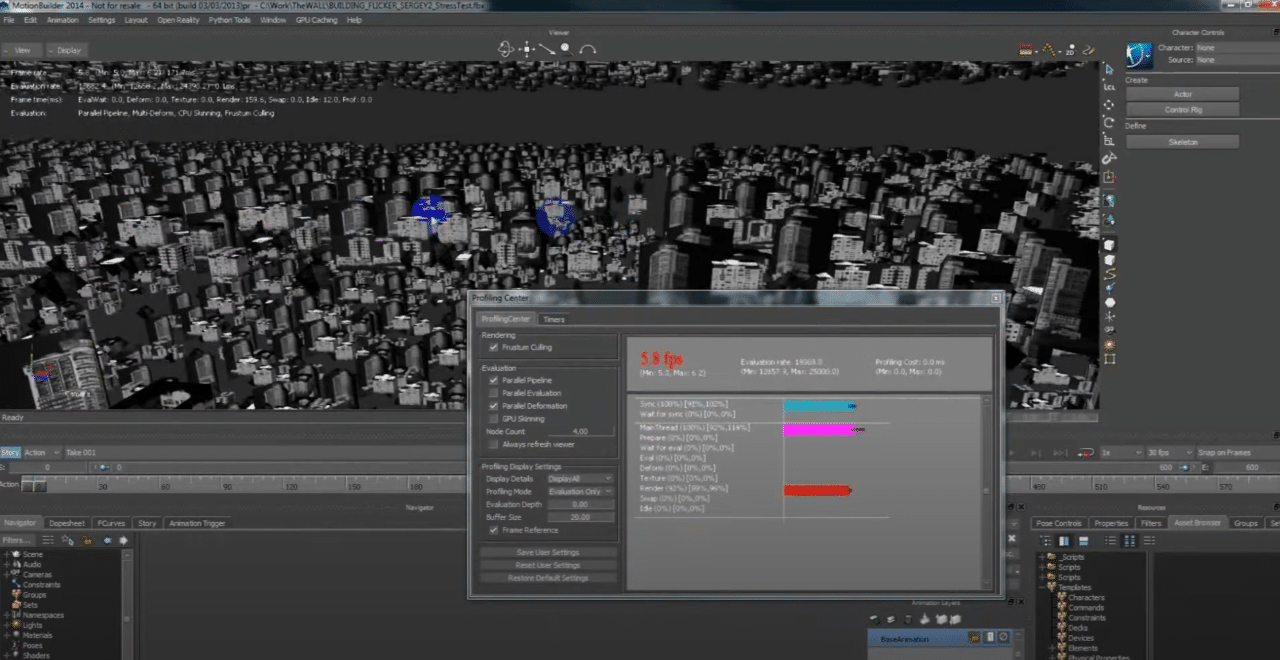
5.8 FPS with 40–60 seconds of loading time when using the 3D scene directly, compared to 60 FPS with just 8 seconds of loading time when utilizing GPU cache.
Video – https://www.youtube.com/watch?v=-1OAM5uxMA8
Extension used for bindless graphics (link to article at the end section)
- GL_NV_shader_buffer_load
- GL_ARB_bindless_texture
In this case, GPU Cache involves preparing geometry, textures, and materials into a format optimized for fast GPU loading. The data is structured specifically for vertex attributes, ensuring efficient alignment:
- Geometry Optimization:
The geometry is reorganized into a format tailored for rapid GPU access. Vertex attributes are sorted by material and indexed to the appropriate material, allowing for streamlined rendering. - Material Consolidation:
All materials are packed into a single array with a defined structure, reducing overhead and simplifying material lookups. - Texture Optimization:
Textures are preprocessed into a GPU-friendly format, including precomputed mipmap levels. This not only speeds up loading but also mitigates texture aliasing and jittering when viewed at a distance in perspective.
For texture compression, I utilized OpenGL extensions to upload uncompressed data to the GPU, allowing the driver to determine the most suitable compression format. I then extracted the compressed data and stored it in a file cache. On subsequent loads, the precompressed textures could be quickly uploaded to the GPU, dramatically improving load times for large static environments.
This approach has multiple benefits:
- Reduced Scene Load Times: Precompressed textures and optimized geometry significantly decreased loading times.
- Improved GPU Memory Usage: Compressed textures made more efficient use of video memory.
- Increased Visual Stability: Generating mip levels enhanced image quality, reducing texture flickering at a distance.
This system provided a substantial performance boost for static environments, making real-time rendering faster and more stable.
Lighting.
In standard real-time OpenGL, shaders are typically limited to eight light sources per object. For film production, this limitation needed to be addressed. To overcome it, I implemented a clustered lighting approach.
With this method:
- The scene is divided into regions, or clusters.
- Light sources are assigned to lists corresponding to the clusters they intersect in the current frame.
- Each cluster calculates lighting only for the sources within its bounds, rather than processing all the lights in the scene.
This optimization significantly reduced the computational load while allowing for a much higher number of light sources in a scene. The implementation of this method is well-documented in https://www.aortiz.me/2018/12/21/CG.html
A short tech demo of the following cluster lighting feature,
video – https://www.youtube.com/watch?v=87rAFa49jos
Shadows
For global (sun) shadows, I used a cascade shadow mapping technique.
The camera frustum was divided into four regions based on distance, and the scene was rendered into four separate textures. This is a well-known technique, and I will provide a link at the end of the article for further reading on it.
Additionally, shadows could be visualized separately as a filter for the composition master, enhancing control over the final scene appearance.
For creating local depth effects within the scene, I also implemented 3D fog, adding atmospheric depth to specific areas of the environment.
To create reflection effects, there was an option for additional visualization into a 2D texture or a cube map (in the case of spherical reflections, such as for external car windows).
Nvidia article – https://developer.download.nvidia.com/SDK/10.5/opengl/src/cascaded_shadow_maps/doc/cascaded_shadow_maps.pdf
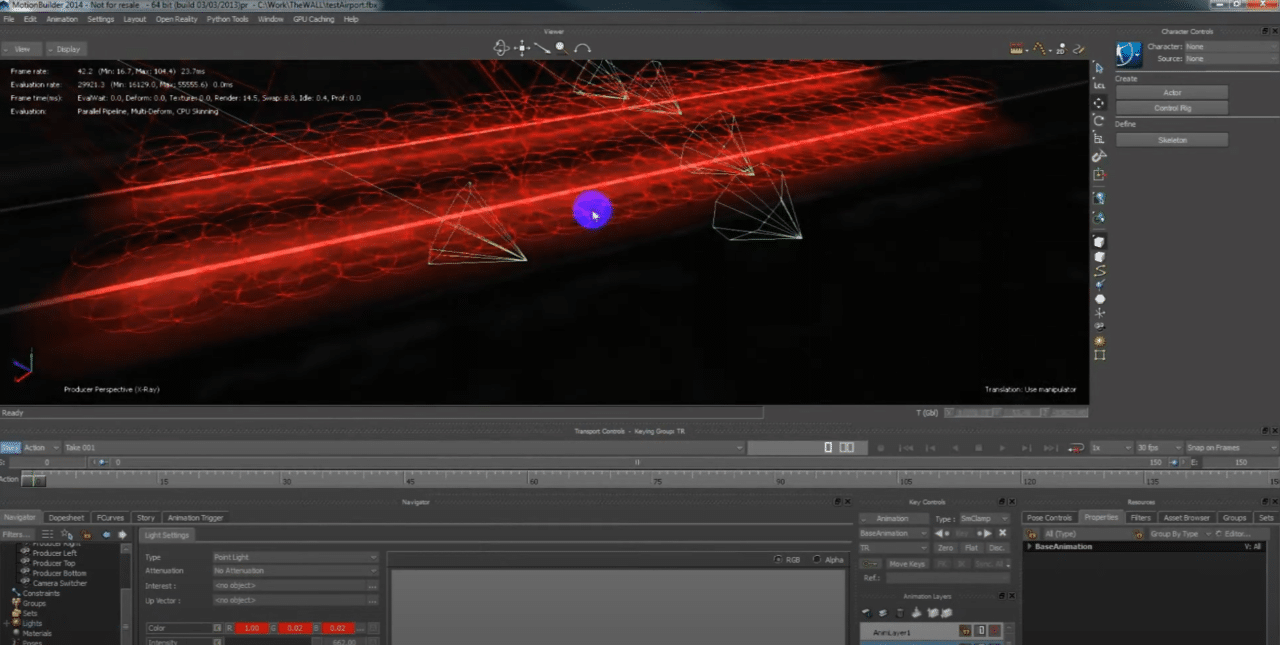
Final rendering.
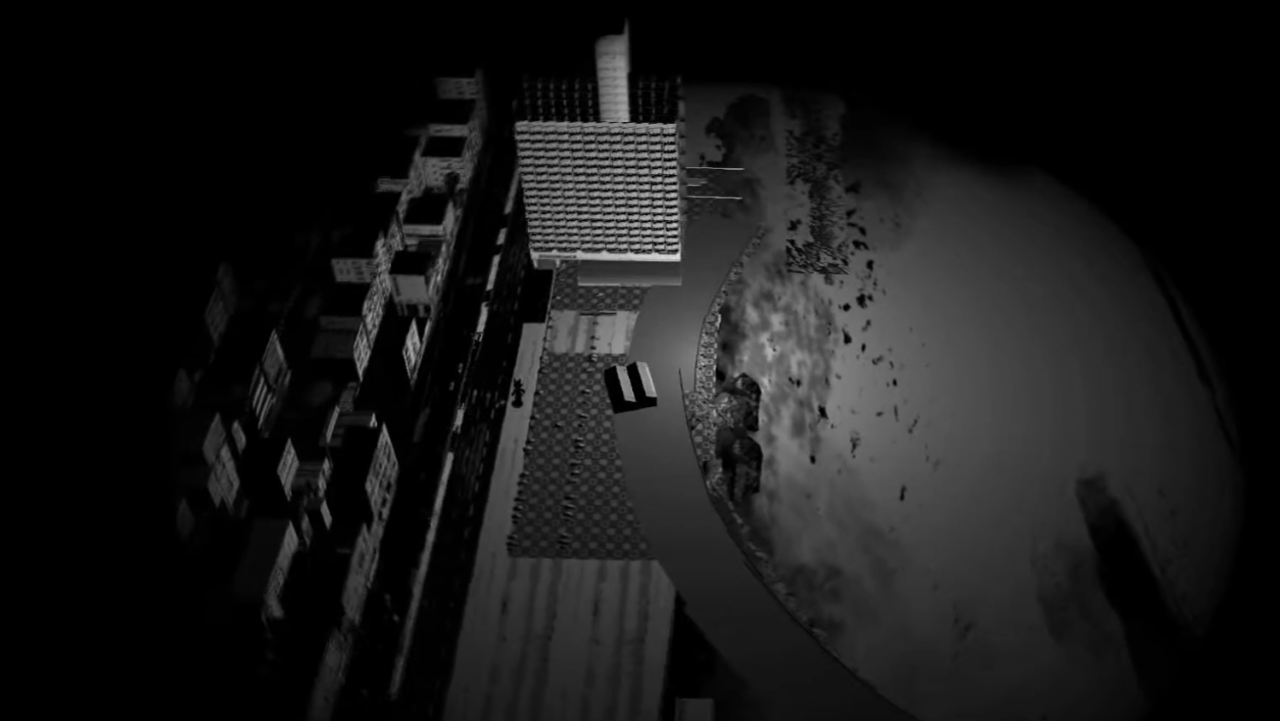
As we neared the finish line, one serious and important barrier remained. In the final image, there was a lot of flickering during motion, especially with meshes and fences modeled with fine and thin geometry. I spent a lot of time thinking about how to address this and realized that we would need to tackle the problem head-on.
I implemented supersampling rendering—a technique that uses a grid of screens with a total resolution several times greater than the visualized resolution. By downsampling the image, we could reduce artifacts. Combined with standard 16x multisampling and about 3×3 or sometimes 5×5 tiles, this approach produced the high-quality image we needed—one that could be shown in a cinema and still be watchable. On a large screen, any flickering is amplified and can be unsettling to the audience.
And one more issue on rendering large scenes we had was due to z-fighting.
Logarithmic Depth
First and foremost, to improve the depth accuracy in scene rendering, I used logarithmic depth.
Here is an example of linear depth:
and a result of a use of logarithmic depth.
the z-fighting effect is not that visible any more.
Video – https://www.youtube.com/watch?v=SwAhiech3IU
Simulation
One of the tasks I faced was vehicle simulation. In the film, the main characters travel between scenes by car, and there are also scenes with urban traffic or people riding scooters.
MotionBuilder already includes integrated PhysX and ODE (Open Dynamics Engine). The first version of the vehicle simulation was created using the built-in physics, but it lacked stability and greater control over the vehicle’s behavior.
I had experience with vehicle simulation using the open-source Newton Physics Engine in a 3D car tuning project. So, I decided to integrate this physics engine into MotionBuilder, aiming to record vehicle simulations and later process the baked animations.
The integration proved to be a very complex and time-consuming task, and I can honestly say it did not pay off. Once the simulation was working, allowing for vehicle passes to be recorded, I realized that running a simulation while having a predefined scenario was quite tedious and not very productive. It became clear that it was much easier to create a small vehicle rig for manual and procedural animation, using various pivot points, wheel projections onto surfaces, and calculating wheel rotation and steering based on the car’s trajectory.
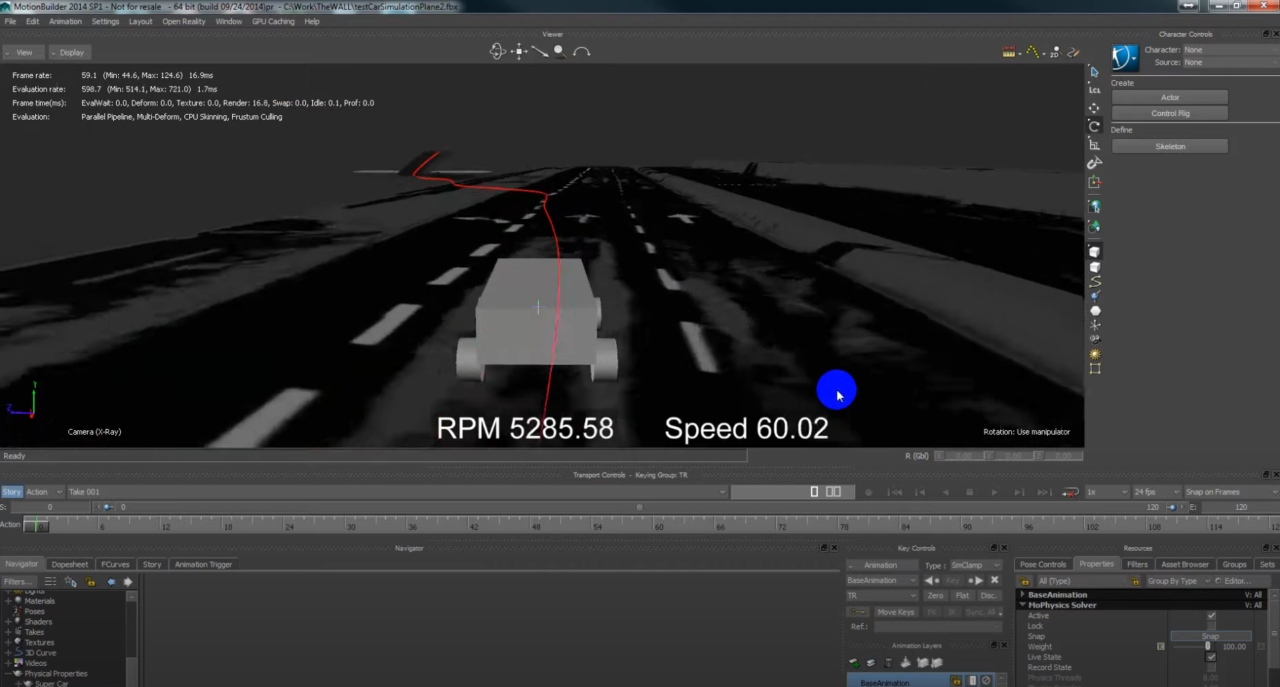
Video – Car Simulation for MotionBuilder
Although implementing vehicle simulation in MotionBuilder was my idea, dream, and a strong desire, within the scope of the project, I can say that it ultimately proved to be unnecessary.
Rigging
In the end, that’s what I had to do—it turned out to be much more convenient and practical than redoing simulations with a joystick and trying to hit a specific timing, only to later edit over it.
I developed several rigs for the luggage, scooter, and vehicle.
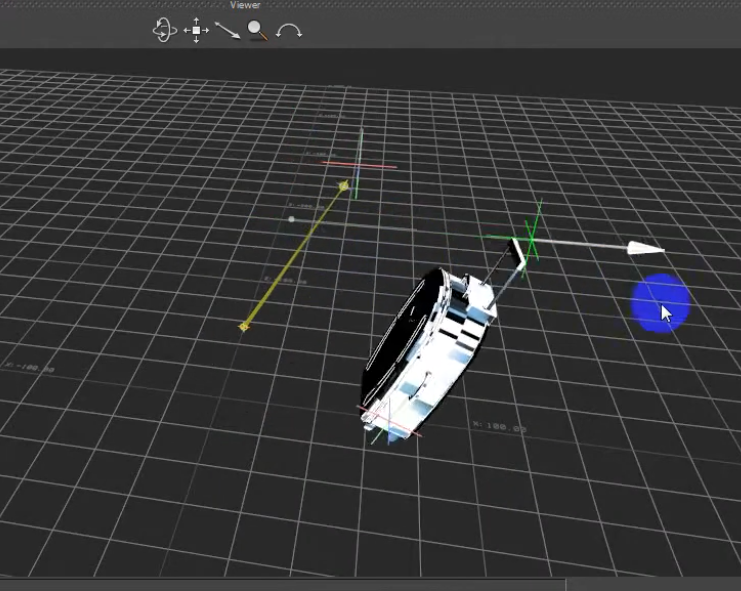
Video of a luggage rig – https://www.youtube.com/watch?v=KgxZS86UHo8
Procedural Animation
I also developed additional utilities for parametric animation, such as for tossing objects and for rotating and turning wheels when moving along a given trajectory, especially in the case of large urban traffic. This turned out to be an even faster and more convenient approach than using a rig for each individual vehicle.
Some scenes in the film required specialized types of procedural animation. For example, in the scene with the construction of a wall, where elements needed to fall from above and arrange themselves into a structure along a predefined path.
Wall Bricks Constraint
In this case, it was very convenient and efficient to create a new FBConstraint. I also used simple mathematical expressions within input properties to allow for the use of multiple such constraints, creating individual movement and distributing them over time.
An FBConstraint is a block of animation logic that runs in a parallel thread, and multiple constraints can execute in parallel with each other.
Conclusion
What Worked Well
Many of the director’s ideas were successfully realized, and I was open to any new concepts, always striving to push boundaries and achieve the desired results.
MotionBuilder proved to be an incredibly flexible, expandable, and efficient platform for production.
I practiced recording video messages, demos of features, and updates. This was an excellent way to keep everyone informed, and I continue to use this approach to this day.
Even with basic OpenGL, by using OpenGL4 extensions and NVIDIA bindless, and relying on top-tier graphics cards, there was a great opportunity for optimization and creating new effects for real-time work.
And, of course, the film was completed!
What Didn’t Work So Well
At times, my personal ambitions took over, and I took on much larger tasks than the project required. For example, a realistic vehicle simulation is impressive and comprehensive, but in the end, it wasn’t very effective for the project itself.
Unit testing was introduced at a late stage, which made it less effective than it could have been.
I would like to thank Cam Christiansen for the opportunity to participate in the creation of the film and to live out such a grand dream without boundaries. Cam also had a vision for the tools needed for the film and creativity, and he demonstrated immense patience, waiting for the implementation to be ready and fine-tuned—after all, everything was done on the fly, so stability wasn’t always achieved on the first try.
A huge thanks to NFB (National Film Board of Canada) and producers David Christensen and Thompson Bonnie for their support during the tough times the project faced, especially at a critical moment in my life related to the birth of my daughter. Their support helped me avoid a very difficult situation.
There are many things I could have done differently, but perhaps I expected too much versatility from my work when a more effective approach would have been to just create the tool now and apply it in action. These tools were not final products; they were simply makeshift tools for the film, very much in a prototype stage. Perhaps I was wrong to expect the creation of final products in addition to this, although it was nice to dream about it.
I also want to note that I developed a unit testing system for features closer to the end of the film. The instability caused by changes in the system often led to breakdowns in existing scenes and logic, delaying the work on the film. Looking back at the process now, I would have introduced unit testing at an earlier stage to have better control over the systems as changes were made.
That said, I am glad the film was completed. MotionBuilder is truly an incredible and flexible platform, even extending beyond the animation system. At a time when Unity and Unreal Engine lacked advanced animation systems and nonlinear editing, I believe MotionBuilder was an excellent choice, ahead of its time.
Links and resources
Here is a set of links to topics and resources that I’ve mentioned in the article.
The Wall film on Canadian Film Board – https://mediaspace.nfb.ca/epk/wall
Autodesk MotionBuilder – https://www.autodesk.com/products/motionbuilder/overview
MoPlugs project on github – https://github.com/Neill3d/MoPlugs
Neill3d Youtube channel – https://www.youtube.com/@Neill3d
Newton physics engine – https://newtondynamics.com/forum/newton.php
Nvidia bindless graphics – https://www.nvidia.com/en-us/drivers/bindless-graphics/
nvFX by Tristan Lorach – https://github.com/tlorach/nvFX
Logarithmic depth buffer – https://www.gamedeveloper.com/programming/logarithmic-depth-buffer
Clustering lighting – https://www.aortiz.me/2018/12/21/CG.html